Choose each nail by width, curvature, and comfort. A saved ten-finger size map is useful only when it names the exact set it belongs to.
Use the chart for your actual set
A number on the underside of a press-on identifies a size within that product's system. It is not a universal measurement. A size that works in one collection may not match another, so save the brand, collection, and shape with any sizing notes.
If ordering from measurements, follow that maker's measuring method. Some charts refer to a straight width while others use a measurement over the nail's curve. Record millimeters when requested and check the units before comparing your results. A photograph alone cannot confirm the fit.
What do press-on nail numbers mean?
The number on a press-on is a piece-size identifier within the maker’s system. It does not assign the nail to a fixed finger. Choose the comfortable fit for each finger first, then record its number with the brand, collection, and shape.
For a concrete example, Glamnetic’s Short Almond chart lists number 05 and a width of 10.68 mm in separate columns. The marking 05 does not mean a 5 mm width. That example explains how to read a chart; it does not tell you which finger should wear that piece.
- Record left and right hands separately after dry-fitting; matching fingers do not have to use matching numbers.
- When changing brands, shapes, or collections, recheck the chart and fit rather than ordering the same numbers automatically.
- If a marking is missing or unreadable, use the maker’s chart or a sizing sample. A photograph of the design cannot identify a reliable replacement size.
| What you are reading | How to interpret it |
|---|---|
| Piece number, such as 05 | Look up the corresponding cover in the exact product’s chart. Keep any leading zero when recording the printed identifier. |
| A measurement followed by mm | This is a dimension. Check whether the column describes width or length and use the maker’s measuring method. |
| XS, S, M, or L on a set or selector | Read the legend: it may describe a preset combination of widths or a length option. It is not a universal conversion from piece numbers. |
XS, XXS, XL, and XXL: set size or nail length?
Letters such as XS, XXS, XL, or XXL need the exact seller’s legend. On a preset set they may describe a combination of finger widths; in a length selector they may describe shorter or longer covers. Neither use provides a universal millimeter conversion. An XS set can still contain several different piece numbers.
Read the selector beside the label and compare it with the size chart. If the choice is a width set, check all five listed positions for each hand and ask how to handle a finger that differs. If it is a length choice, find the complete cover length for each size you need. Do not make a narrow thumb cover fit by choosing an XL length.
| Listing detail | Useful next check |
|---|---|
| A five-number sequence beside XS or XL | Match the stated finger order and the maker’s piece-number chart; record both hands separately. |
| XS, short, or XL beside a shape or length selector | Confirm the maker’s meaning and compare listed lengths, widths, and your own fingertip projection. |
| Only a letter label, with no legend | Request the dimensions or a matching sizing kit before treating it as your size. |
Press-on nail measurements: know which dimension you are recording
A useful measurement guide starts with the chart for the exact covers you plan to use. Record the brand, collection, shape, and measuring method before writing down a number. A width taken across a curve cannot automatically be compared with a straight-line measurement.
Keep the measurement and the selected piece number in separate fields. For example, a note reading “left index: measured width ___ mm; chosen piece ___; fit notes ___” records both the observation and your eventual choice without treating them as the same thing.
- Check the ruler units and the chart units before copying a value. If converting inches to millimeters, multiply by 25.4; conversion does not correct an inaccurate measurement.
- Remeasure an unexpected result using the same method. Do not average left and right hands or round automatically to a size when the maker gives no rounding rule.
- When the chart or method is unclear, request a matching sizing sample or clarification before ordering a custom-sized set. Save the date with your finished record.
| Field | What to check |
|---|---|
| Natural-nail width | Use the widest point and the measuring method requested by the maker. Measure all ten nails separately. |
| Cover width and size code | Compare your measurement with the exact style chart. A code such as 05 is an identifier, not a millimeter value. |
| Length | Distinguish your natural nail length, the full cover length, and the extension beyond your fingertip. Ask which dimension a chart lists. |
| Curve and contact | Record what happens in a dry fit. A width measurement alone does not show whether the underside rests comfortably against your nail. |
A measuring example from PRESSE
PRESSE provides a measuring-tape method for its own sizing chart. Here is how that specific example works. Use another brand's method when comparing its chart; these measurements are not a universal size conversion.
- Find the broadest part of the natural nail and hold the measuring tape against it without leaving space underneath.
- Mark where the two side edges meet the tape, then record the distance between those marks in millimeters.
- Compare the recorded width with PRESSE's chart for that finger. Repeat the measurement for each nail rather than assuming both hands match.
The quarter method: a reference for sizing photos
The quarter method, sometimes called the quarter trick, places a known coin beside bare nails so a maker can use it as a size reference in a photograph. The U.S. Mint lists a circulating U.S. quarter’s diameter as 24.26 mm. That is the coin’s diameter, not a nail size or proof that a photograph measures a curved nail accurately.
For a documented example, H2O Nail & Wax Studio requests a U.S. quarter beside flat, bare fingers and a camera directly overhead. Its own order process asks for three views of each hand: index/middle/ring together, thumb separately, and pinky separately. It specifies bright, even lighting and warns against angled images, curled fingers, blur, or placing the coin on the nail.
Use the photo instructions of the maker receiving your order. Another studio may request different views or a different reference. Identify the country and coin; do not substitute a similarly named foreign coin or enlarge a photo until an on-screen ruler appears to match.
A photograph can still distort scale if the camera is angled or the nail and coin sit at different heights. It also does not show the underside contact of a finished tip. Send the original requested images, ask the maker to confirm the proposed sizes, and dry-fit a matching sizing sample when possible. Do not calculate a supposedly exact size from pixels alone.
Dry-fit every finger in good light
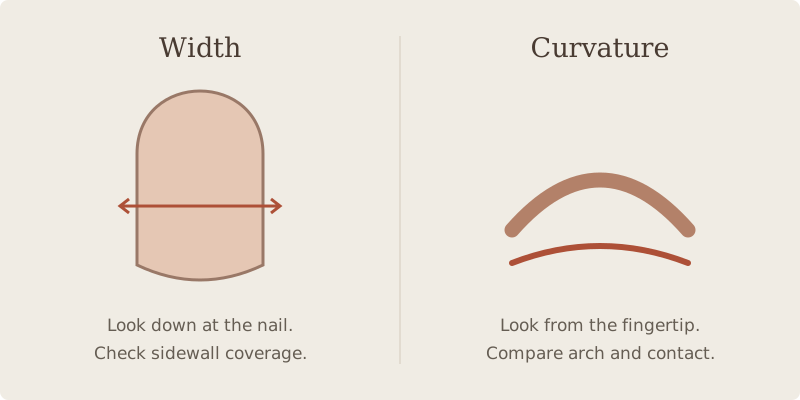
Start with clean, bare nails and place each candidate on top without adhesive. Look from above and from the tip. A suitable candidate should cover the nail comfortably from side to side while staying off the surrounding skin. The base should sit near the cuticle area without pushing into it.
Do not assume matching fingers on your left and right hand use the same size. Try each one separately, then put your choices in two labeled rows. This small organizational step prevents switching similar-looking nails once you start application.
- Too narrow: visible strips of natural nail remain along the sides.
- Too wide: the cover extends onto skin or looks oversized at the sidewalls.
- Wrong curve: the center rocks or gaps remain despite a reasonable width.
- Uncomfortable fit: the nail needs squeezing or sustained force to sit in place.
What to do between sizes
If the manufacturer permits reshaping the press-on, a slightly larger size may be adjustable by filing its side edges a little at a time. Recheck after each pass. Work on the artificial cover before attachment, and keep its sides balanced. Some finishes or designs may not tolerate this adjustment.
Filing cannot reliably correct a major mismatch in curvature. When a nail rocks, pinches, or still overlaps skin, try another profile or a sizing sample. Do not compensate by squeezing the cover flat or filling a poor fit with extra glue.
When the size number does not explain the fit
Use the measuring and dry-fitting process above as your starting point. If a set still does not fit, identify which dimension needs attention before changing size or adding adhesive. These guides address three different fitting questions.
Download a blank press-on nail size chart
Write down ten sizes in a consistent order, such as left pinky to left thumb followed by right thumb to right pinky. Add a note for any adjusted nail. A quick picture of the layout can be helpful, but keep the written numbers too.
Recheck fit when you change shapes or product lines. Length and width describe different things: a short nail can still be too wide, and an extra-short cover may not suit a long natural nail bed. Sizing should never hurt. Do not apply covers over damaged nails.
Use the free ten-finger worksheet below to keep the exact collection, shape, measuring method, width in millimeters, set size, and dry-fit notes together. The PDF is a printable US Letter record; the CSV is editable in a spreadsheet. Both start blank because a size number or S/M/L label cannot be converted reliably without the actual maker’s chart.
Fill in each hand separately using the selected product’s method. Record a measurement only after checking it, and keep any adjustment in the notes column. This worksheet is not a measuring ruler or a promise that a particular size will fit.
A few common questions
Should press-on nails touch the surrounding skin?
No. Choose a cover that fits over the nail rather than overlapping the skin. A skin overlap is a reason to recheck the size or profile.
Are press-on nail size numbers universal?
No. Treat numbers as product-specific and compare actual measurements or a sizing sample when changing collections.
Can I use more glue to fix a gap?
Do not use adhesive to compensate for an unsuitable fit. Try a different size or curvature and follow the adhesive's specified amount.
Is there one press-on nail chart for all companies?
No. Use the exact product range’s chart and measuring method. Our blank chart records your own checked measurements and chosen sizes; it does not assign universal numbers or preset small, medium, and large combinations.
Sources & reading notes
This guide explains general considerations. Product labels and instructions vary, so check the specific kit and adhesive you use.
Get to know Kittiva.
Explore the designs and kit details on the brand’s own website. Check current contents and delivery availability before choosing.
Read our Kittiva spotlightThis editorial project supports Kittiva.