Build the cards around the actual set and its directions. Test the display card inside the box, and complete the instruction checklist with product-specific details before use.
Decide what belongs on each card
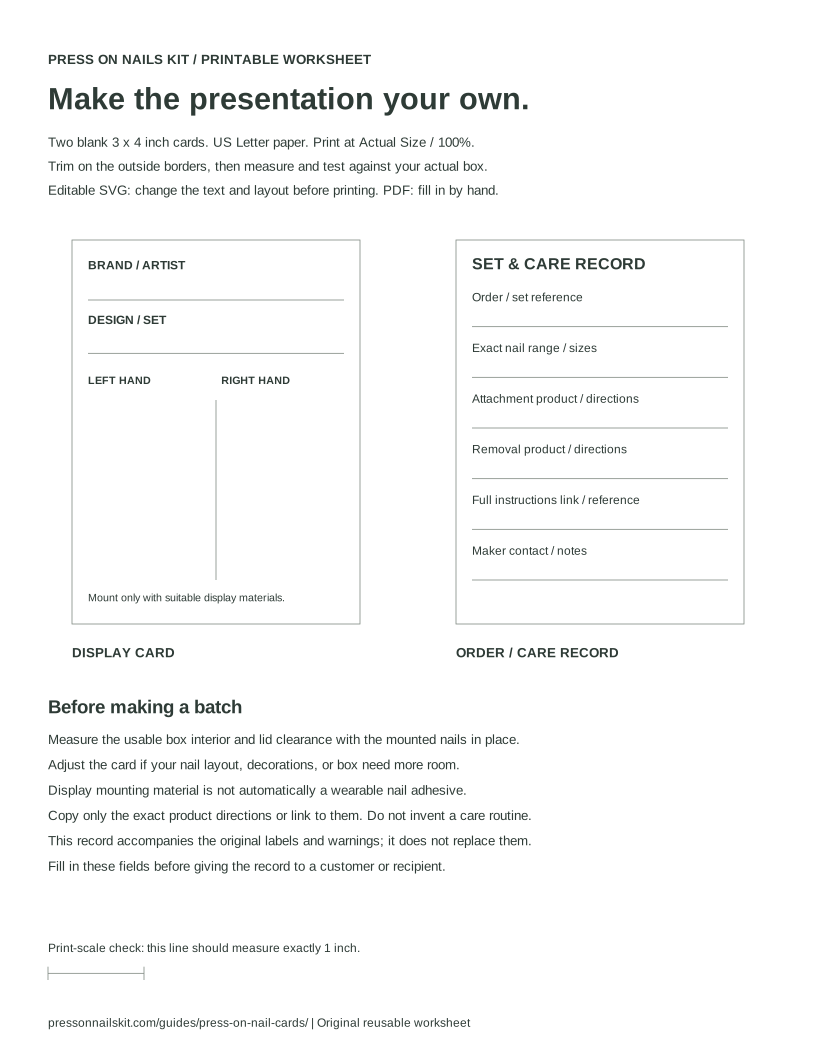
Use the display card for a brand or artist name, design reference, and clearly separated left-hand and right-hand mounting areas. Keep text away from the nails so it remains visible. For more than ten nails, plan a separate spare-size area or a larger layout.
Use the order/care record for the set reference and the exact attachment and removal instructions that accompany it. This keeps useful information accessible after the display card is covered. It also lets you update the care record when an adhesive changes without redesigning the whole presentation.
A display card is the flat insert carrying a set. A display stand or rack supports cards or individual nails for viewing; it needs its own stability and spacing checks. If you want to present several sets at a table or photograph loose nails, choose the support first, then size any cards to fit it.
Download the free press-on nail display card template
The original US Letter sheet contains two separate 3 × 4 inch cards: a blank display card with left- and right-hand mounting areas, and an order/care record with fields for product directions. Use the PDF for printing or the SVG to edit text and layout in a compatible vector editor. These are starting dimensions, not a promise that the cards fit every box or nail set.
Print at Actual Size or 100%, with fit-to-page scaling turned off. Trim along the marked outlines and measure a finished card before printing a batch. If you change its dimensions, recheck text size, nail spacing, and the complete arrangement inside your box.
What should a press-on nail instruction card include?
An instruction card should identify the actual products and point to their complete directions. The small care record above is for references and notes; it is not a substitute for the original instruction leaflet. Use a separate full-size sheet when the sequence and warnings need more room.
FDA advises reading nail-product labels and warnings. AAD warns against covering existing nail problems and recommends telling a doctor which products were used if a reaction occurs. Keep ingredient information and product names with the set rather than relying on a generic card.
- Identify the nail set, exact adhesive or pre-applied system, and compatible remover or removal method.
- Include a readable directions link or leaflet reference and the date you checked it. Verify that the reference opens the correct product version.
- Record the manufacturer’s preparation, backing, placement, holding, waiting, and removal steps. Do not assign the same timing to glue, separate tabs, and light-cured systems.
- Preserve the supplied warnings. Use space for questions or missing information instead of guessing an instruction.
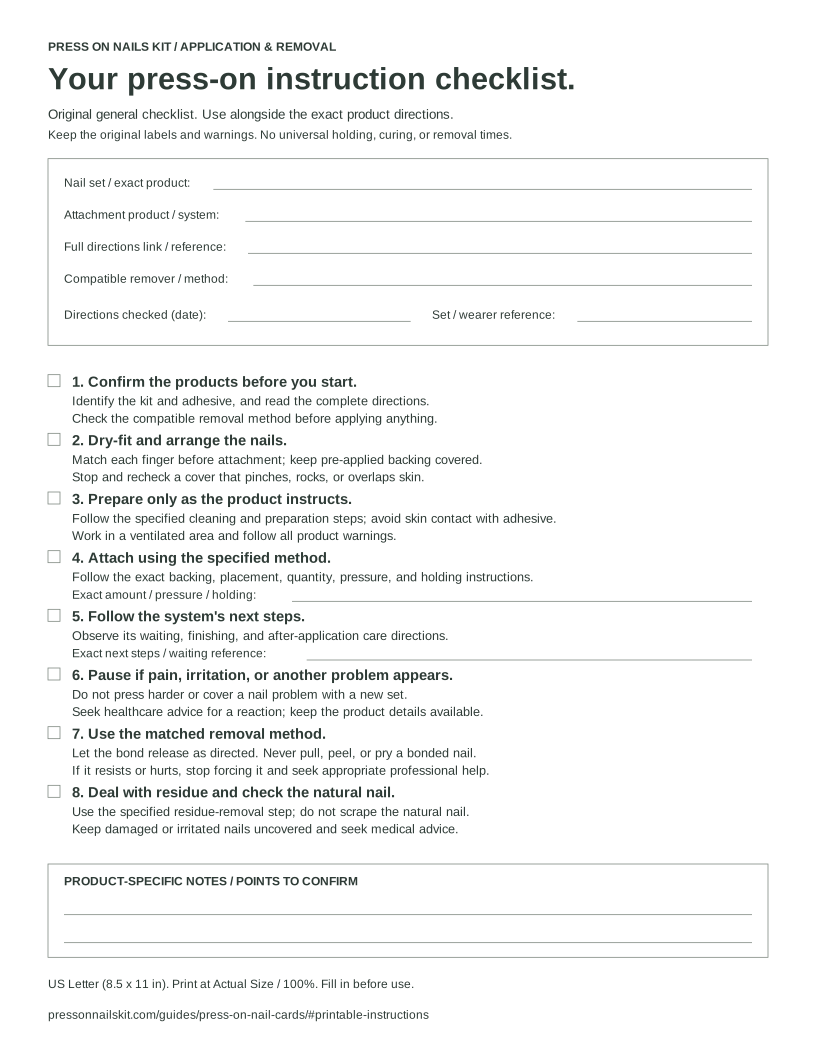
Download printable press-on nail instructions
This original one-page US Letter checklist combines eight useful process checks with fields for your products and instruction references. It covers identifying the system and removal plan, dry-fitting, preparation, attachment, the next product-specific steps, signs to pause, gentle removal, and remaining residue.
Fill in the product, adhesive, full-directions reference, compatible removal method, and check date before use. Add the exact holding and waiting details from the maker; the worksheet deliberately supplies no universal duration, soaking recipe, or curing method. It accompanies the product directions rather than replacing them.
Print the PDF at Actual Size or 100% on US Letter paper. Use the SVG to edit the layout in a compatible vector editor. Check one printed copy for readable text and complete fields before giving it to a recipient. Keep the original labels and instructions with it.
Test the card with the actual set
Arrange the unmounted nails first. Keep each hand in a consistent finger order, then check the longest tip and tallest decoration against the box lid. The card, mounting material, and curved nails all take up space. Card dimensions alone cannot establish clearance.
Choose stock your printer accepts and test one finished sample. Check whether it stays flat, the writing remains legible, and the mounting material releases as intended. Custom Boxes Inc. describes paperboard and foam inserts as different packaging structures; a flat printed card does not provide the same support as every fitted tray.
Keep mounting material separate from wear products
Use a mounting method suitable for the packaging and nail finish. Do not label storage tape as wearable adhesive tabs: LumiCat, for example, explicitly says the strips supplied with its storage box are not for skin. Keep the original labels on any glue, tabs, or remover supplied alongside the set.
Record the exact product name and a readable instruction reference on the care card. Preserve the original directions rather than replacing them with generic wear-time, soaking, or curing claims. A blank record organizes information; it does not determine which products are compatible.
Proof one complete package before making copies
For mailed orders, assess outer protection separately. USPS packaging guidance calls for appropriate packaging and cushioning that prevents contents from shifting; a display card alone is not shipping protection. For a personal collection, keep the record with its matching set in a box or binder.
- Fill in a sample card and check every product name, order reference, and instruction link.
- Confirm that left and right labels match the arranged set. Record manufacturer size codes separately from measurements.
- Place the cards and actual contents inside the box. Close it gently and check that nothing presses against the designs.
- Keep a dated master file so future cards use the current product details.
A few common questions
Can I edit the press-on nail card template?
Yes. Open the SVG in a compatible vector editor to change the text or layout. The PDF is the ready-to-print version. Check a physical sample after any changes.
Is the card template a nail sizing chart?
No. Its spaces organize the finished set; they do not measure nail width or establish manufacturer size codes. Use the separate sizing guide for that task.
Does the template include universal application instructions?
No. The display-card download includes a blank care record. The separate printable checklist supplies a general process sequence, with fields for the exact product instructions and timings. Keep the original directions and warnings with either document.
Sources & reading notes
This guide explains general considerations. Product labels and instructions vary, so check the specific kit and adhesive you use.
- LumiCat: storage mounting strips and their use restrictions
- Custom Boxes Inc.: packaging insert and accessory structures
- USPS: choosing packaging and preparing a shipment
- FDA: nail-product labels, warnings, and ventilation
- AAD: existing nail problems and product reactions
- KISS: fitting before application and removal without force
- KISS imPRESS: product-specific sizing, backing, and attachment sequence